Kubernetes Scheduler
1. Kubernetes Scheduler
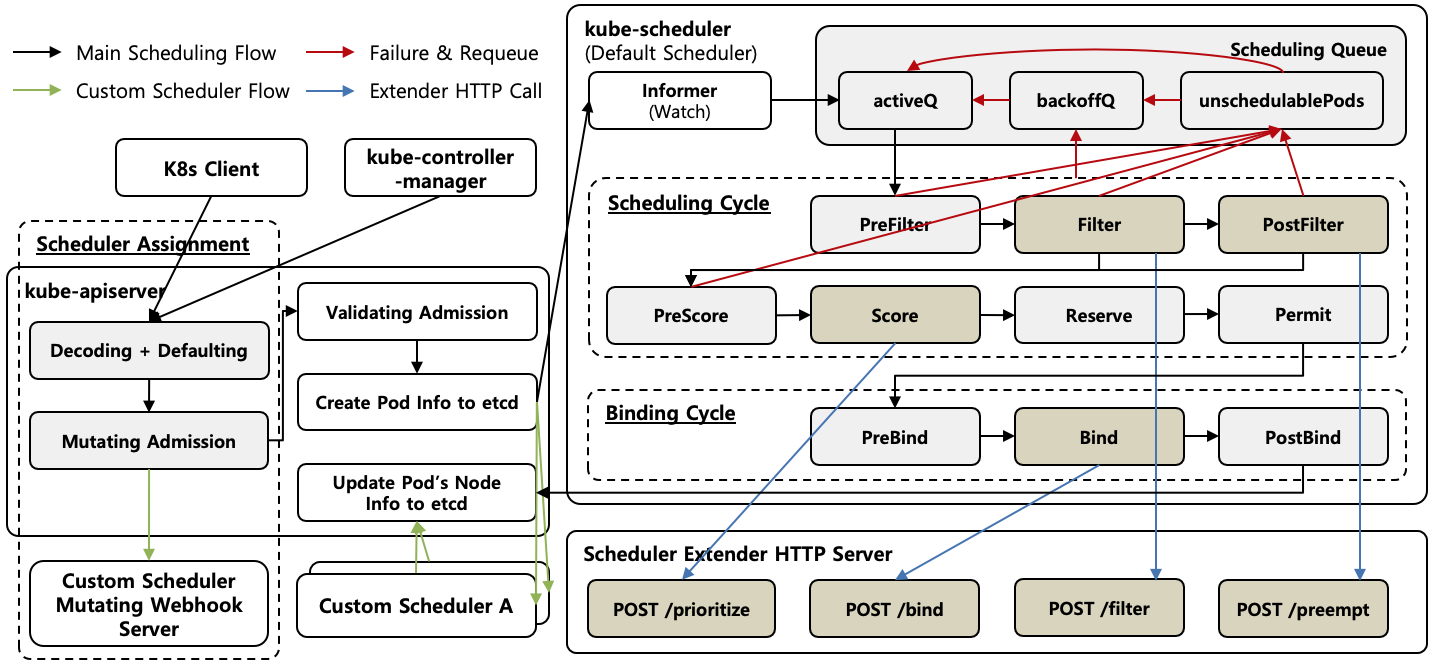
[Figure 1] Kubernetes Scheduler Architecture
Kubernetes Scheduler는 생성된 Pod를 어느 Node에서 실행할지 결정하는 Control Plane Component이다. [Figure 1]은 Kubernetes Scheduler의 Architecture를 나타내고 있다. Pod를 담당할 Scheduler는 Pod가 생성될 때 kube-apiserver의 Defaulting과 Mutating Admission 과정에서 결정되며, 별도로 지정하지 않으면 기본 Scheduler인 kube-scheduler가 Pod를 담당한다.
1.1. Scheduler 지정
Kubernetes Cluster에서 동작하는 각 Scheduler는 고유한 이름을 갖고 있으며, Pod를 담당할 Scheduler는 Pod의 spec.schedulerName에 Scheduler의 이름을 명시하여 지정한다. 각 Scheduler는 자신의 이름과 일치하는 Pod만 가져가서 Scheduling을 수행하기 때문에, 이름을 기준으로 하나의 Kubernetes Cluster에서 다수의 Scheduler를 함께 운영할 수 있다. 반대로 존재하지 않는 Scheduler 이름이 명시된 Pod는 어느 Scheduler도 가져가지 않기 때문에 Pending 상태로 남는다.
| |
기본 Scheduler인 kube-scheduler의 이름은 실행될 때 --config 파라미터로 전달받는 KubeSchedulerConfiguration의 profiles에 정의되며, [File 1]은 Default 설정과 동일한 Profile 설정을 나타내고 있다. profiles 자체를 생략하거나 Profile의 schedulerName을 생략하면 kube-scheduler는 default-scheduler 이름이 설정된 하나의 Profile로 동작하며, 이 기본값 때문에 Default Scheduler의 이름이 default-scheduler가 된다.
| |
[File 2]는 두 개의 Profile을 정의하는 KubeSchedulerConfiguration의 예제를 나타내고 있다. default-scheduler Profile은 Plugin 구성을 변경하지 않아 Default Scheduler 그대로 동작하고, no-scoring-scheduler Profile은 plugins 설정으로 PreScore와 Score 단계의 모든 Plugin을 비활성화하여 점수 계산 없이 빠르게 Node를 결정하는 Scheduler를 제공한다. 이처럼 Profile마다 다른 Plugin 구성을 정의하면, 하나의 kube-scheduler로 Scheduling 동작이 서로 다른 여러 Scheduler를 운영할 수 있다.
| |
[File 3]은 schedulerName을 생략한 Pod 생성 요청과 kube-apiserver에 저장된 Pod를 나타내고 있다. 생략된 spec.schedulerName은 kube-apiserver의 Defaulting 단계에서 자동으로 채워지기 때문에, 저장된 모든 Pod는 담당 Scheduler의 이름을 항상 갖는다.
| |
Defaulting은 [Figure 1]의 Scheduler Assignment 영역과 같이 kube-apiserver가 요청 Body를 객체로 Decode한 직후에 API 버전마다 등록된 Defaulting 함수로 비어 있는 필드를 채우는 단계이며, [Code 1]은 Pod의 Defaulting 함수를 축약하여 나타내고 있다. SetDefaults_PodSpec()은 dnsPolicy, restartPolicy 같은 다른 필드의 기본값과 함께 비어 있는 schedulerName에 DefaultSchedulerName 상수의 값인 default-scheduler를 설정한다.
Defaulting 이후에는 Mutating Admission 단계가 수행되기 때문에, Mutating Admission Webhook이 Pod를 전달받는 시점에는 schedulerName이 이미 default-scheduler로 채워져 있다. 따라서 특정 Pod를 Custom Scheduler가 담당하도록 만들려면 Mutating Webhook에서 채워진 schedulerName을 Custom Scheduler의 이름으로 덮어써야 하며, schedulerName은 생성 후에는 변경할 수 없는 필드이기 때문에 이러한 변경은 생성 시점에만 가능하다.
2. kube-scheduler
kube-scheduler는 Kubernetes의 기본 Scheduler이며, [Figure 1]의 kube-scheduler 영역과 같이 Scheduling Framework를 기반으로 동작한다. Extension Point는 Scheduling Framework가 Scheduling Queue부터 Binding Cycle까지의 정해진 단계에서 Plugin을 호출하도록 열어 둔 지점이며, Resource 검사나 Affinity 처리 같은 kube-scheduler의 기본 기능도 모두 각 Extension Point에서 호출되는 내장 Plugin으로 구현되어 있다. 또한 직접 구현한 Plugin이나 외부 Webhook도 Extension Point에 연결하여 Scheduling 동작을 확장할 수 있다. kube-scheduler의 동작은 다음의 세 부분으로 구분된다.
- Scheduling Queue : Node가 결정되지 않은 Pod는 Informer의 Watch를 통해서 감지되어 Scheduling Queue에 저장되며, Scheduling에 실패한 Pod도 Scheduling Queue로 돌아와서 재시도를 대기한다.
- Scheduling Cycle : Scheduling Queue에서 Pod를 하나씩 꺼내서 Extension Point의 Plugin을 거치면서 Node를 결정한다.
- Binding Cycle : 결정된 Node로 Pod를 Bind하여
spec.nodeName을 설정하며, Goroutine을 통해서 비동기로 수행된다.
2.1. Scheduling Queue
Scheduling Queue는 Node가 결정되지 않은 Pod가 Scheduling을 대기하는 Queue이다. Scheduling Queue는 PreEnqueue, QueueSort 같은 Extension Point를 통해서 Pod가 Scheduling을 시작할 준비가 되었는지와 Pod를 꺼내는 순서를 결정하며, Scheduling Cycle은 이 순서대로 Pod를 하나씩 꺼내서 처리한다. Scheduling에 실패한 Pod는 다시 Scheduling Queue로 돌아오며, 이후 Cluster Event가 발생하면 QueueingHint를 통해서 재시도 여부가 판단된다.
2.1.1. Queue 구조
Scheduling Queue는 [Figure 1]에서도 나타나 있는 것처럼 내부적으로 세 가지 영역으로 구분된다.
activeQ: Scheduling을 대기하는 Pod가 저장되는 우선순위 Queue이다.backoffQ: 재시도가 예정된 Pod가 Backoff 시간 동안 대기하는 Queue이다. 반복해서 실패하는 Pod가 직렬 구조의 Scheduling Cycle을 계속 점유하는 것을 막기 위한 영역이며, 실패 횟수에 따라서 지수적으로 증가하는 Backoff 시간 (기본 1초에서 최대 10초)이 지나면activeQ로 이동한다.unschedulableEntities: Cluster의 상태가 변하지 않는 한 재시도해도 같은 결과가 나오는 Pod가 저장되는 영역이다. 시간이 지나면 벗어나는backoffQ와 다르게, Scheduling 가능성이 생기는 Cluster Event가 발생해야 벗어난다. Kubernetes 1.36까지는unschedulablePods라는 이름이었다.
Scheduling에 실패한 Pod는 실패 원인에 따라서 서로 다른 영역으로 이동한다. Plugin이 Pod를 거부하여 실패한 경우에는 kube-scheduler가 거부한 Plugin을 Pod와 함께 기록하고 Pod를 unschedulableEntities에 저장한다. 반면에 Plugin 실행 중 발생한 오류나 kube-apiserver 요청 오류 같은 일시적인 오류로 실패한 Pod는 Cluster의 변화와 무관하게 재시도가 필요하기 때문에 unschedulableEntities를 거치지 않고 backoffQ로 이동한다.
거부된 Pod는 Cluster의 상태가 변하지 않는 한 몇 번을 재시도해도 같은 결과가 나오기 때문에, Node 추가나 Pod 삭제 같은 Cluster Event가 발생하여 Scheduling 가능성이 생겼을 때만 unschedulableEntities에서 벗어난다. 벗어나는 시점에 Backoff 시간이 남아 있으면 backoffQ를 거쳐서 activeQ로 이동하고 이미 지났으면 activeQ로 바로 이동하기 때문에, backoffQ는 unschedulableEntities에서 activeQ로 돌아가는 길목의 완충 구간으로 동작한다.
또한 거부된 Pod라도 항상 unschedulableEntities를 거치는 것은 아니다. Scheduling이 진행되는 동안 발생한 Cluster Event는 해당 Pod가 놓쳤을 가능성이 있기 때문에 kube-scheduler가 따로 기록해 두고, Pod가 실패하여 Queue로 돌아오는 시점에 기록된 Event를 검사하여 Scheduling 가능성이 생긴 경우에는 unschedulableEntities를 거치지 않고 backoffQ로 이동한다. 그리고 unschedulableEntities에 일정 시간 (기본 5분) 이상 머문 Pod는 Event가 발생하지 않아도 주기적으로 backoffQ나 activeQ로 이동하는 안전장치도 존재한다.
2.1.2. Extension Point
Scheduling Queue의 Extension Point는 다음과 같다.
PreEnqueue: Pod가activeQ에 들어가기 전에 Scheduling을 시작할 준비가 되었는지 검사하며, 통과하지 못한 Pod는activeQ에 들어가지 못하고unschedulableEntities에서 대기한다. Pod의spec.schedulingGates가 모두 제거되기 전까지 Scheduling을 막는SchedulingGatesPlugin이 대표적이다.QueueSort:activeQ에 저장된 Pod의 처리 순서를 결정한다. 기본 Plugin인PrioritySort는 PriorityClass가 높은 Pod를 먼저 처리하도록 정렬한다.
2.1.3. QueueingHint
| |
unschedulableEntities에 저장된 Pod와 Cluster Event의 연관성은 각 Plugin이 제공하는 QueueingHint를 통해서 판단되며, [Code 2]는 NodeAffinity Plugin의 QueueingHint 구현을 축약하여 나타내고 있다. 각 Plugin은 자신의 판단 결과에 영향을 줄 수 있는 Cluster Event의 종류를 EventsToRegister()를 통해서 등록하고, Event마다 재시도 여부를 판단하는 QueueingHintFn을 함께 제공한다. kube-scheduler는 Cluster Event가 발생하면 Pod와 함께 기록해 둔 거부 Plugin의 QueueingHintFn만 호출하여 Queue 또는 QueueSkip 판정을 받는다.
예를 들어 Node Affinity 조건을 만족하는 Node가 없어서 unschedulableEntities에 저장된 Pod가 있을 때 새로운 Node가 추가되면, NodeAffinity Plugin의 QueueingHintFn은 추가된 Node의 Label이 Pod의 Node Affinity를 만족하는지 검사한다. 만족하면 Queue 판정으로 Pod가 activeQ나 backoffQ로 이동하여 Scheduling이 재시도되고, 만족하지 않으면 QueueSkip 판정으로 Pod는 unschedulableEntities에 그대로 남는다. QueueingHint가 도입되기 전에는 Event의 종류만으로 Pod의 이동을 결정했기 때문에 성공 가능성이 없는 Scheduling 재시도가 반복되었지만, QueueingHint는 Event의 내용까지 검사하기 때문에 불필요한 재시도가 제거된다.
DRA Plugin처럼 외부 Controller의 동작을 기다리기 위해서 Pod를 Pending 상태로 거부하는 Plugin의 경우에는, 거부가 kube-scheduler의 잘못된 판단이 아니기 때문에 Queue 판정 시 backoffQ를 거치지 않고 activeQ로 바로 이동하여 대기 시간을 줄인다.
2.2. Scheduling Cycle
Scheduling Cycle은 Pod를 실행할 Node를 결정하는 과정이다. Scheduling Cycle은 Scheduling Queue에서 Pod를 하나씩 꺼내서 직렬로 처리하며, 꺼낸 Pod는 Filter, Score 같은 Extension Point를 순서대로 거치면서 실행될 Node가 결정되고 이후에 Binding Cycle로 넘어간다. Node를 결정하지 못한 Pod는 Scheduling Queue로 돌아간다.
2.2.1. Extension Point
Scheduling Cycle의 Extension Point는 다음과 같다.
PreFilter: Filtering 전에 Pod의 요청 정보를 전처리하고 사전 조건을 검사한다.Filter: 각 Node가 Pod를 실행할 수 있는지 검사하여 불가능한 Node를 제외한다. Node의 가용 Resource를 검사하는NodeResourcesFit, Node Affinity를 검사하는NodeAffinity, Taint와 Toleration을 검사하는TaintTolerationPlugin이 대표적이다.PostFilter: 모든 Node가 Filtering에서 탈락한 경우에만 실행된다. 기본 Plugin인DefaultPreemption은 우선순위가 낮은 Pod를 축출하여 배치 공간을 확보하는 Preemption을 수행한다.PreScore: Scoring 전에 Filtering을 통과한 Node 목록을 전달받아, 점수 계산에 공통으로 필요한 정보를 미리 계산하여 저장한다.Score: 각 Node의 점수를 계산하고, Plugin마다 가중치를 적용해 합산한 점수가 가장 높은 Node를 선택한다. Resource 사용률의 균형을 평가하는NodeResourcesBalancedAllocation, Container Image 보유 여부를 평가하는ImageLocalityPlugin이 대표적이다.Reserve: 선택된 Node에 Pod가 사용할 Resource를 kube-scheduler 내부 Cache에 미리 반영한다.Permit: Bind 직전에 Pod의 Bind를 승인, 지연 또는 거부한다. 지연된 Pod는 [Figure 1]의 Wait on Permit과 같이 Binding Cycle 시작 시점에서 승인을 기다리며, 다수의 Pod가 함께 배치되어야 하는 Gang Scheduling 구현에 이용된다.
PreFilter, Filter, Reserve, Permit 단계에서 Plugin이 Pod를 거부하면 Pod는 unschedulableEntities로 이동하며, 모든 Node가 Filtering에서 탈락한 경우에는 PostFilter 단계의 Preemption 시도를 거친 뒤에 이동한다. 반면에 PreScore, Score 단계는 Pod를 거부하지 않고 Node의 점수만 계산하기 때문에, 이 단계에서 발생한 실패는 오류로 처리되어 Pod가 backoffQ로 이동한다.
2.3. Binding Cycle
Binding Cycle은 Scheduling Cycle이 결정한 Node로 Pod를 Bind하는 과정이다. Binding Cycle은 Scheduling Cycle과 분리되어 비동기로 수행되며, PreBind, Bind, PostBind 같은 Extension Point를 순서대로 거치면서 Pod가 Node에 Bind된다. Binding Cycle 시작 시점에 Permit 승인을 기다리던 Pod가 거부되면 unschedulableEntities로 이동하지만, kube-scheduler는 Permit까지의 거부만 Scheduling 불가로 판단하기 때문에 PreBind, Bind 단계에서 실패한 Pod는 backoffQ로 이동한다. 두 경우 모두 Scheduling Cycle의 Reserve 단계에서 반영한 Resource는 되돌려진다.
2.3.1. 비동기 Binding
Binding Cycle을 비동기로 수행하는 이유는 Bind가 kube-apiserver에 요청을 전송하고 응답을 기다리는 느린 작업이기 때문이다. kube-scheduler는 Binding Cycle을 별도의 Goroutine에서 수행하고, Bind의 완료를 기다리지 않고 다음 Pod의 Scheduling을 바로 시작한다.
이러한 비동기 구조에서는 Resource가 중복으로 배치될 위험이 생긴다. Node의 남은 Resource는 해당 Node에 spec.nodeName이 설정된 Pod들의 요청량을 제외하여 계산되는데, Bind가 끝나지 않은 Pod는 아직 spec.nodeName이 없어서 이 집계에서 누락되고, 그 사이에 Scheduling되는 다음 Pod가 같은 Resource를 다시 차지할 수 있기 때문이다. kube-scheduler는 Scheduling Cycle의 Reserve 단계에서 해당 Pod가 사용할 Resource를 내부 Cache에 미리 반영해 두고 다음 Pod의 Scheduling은 이 Cache를 기준으로 판단하기 때문에, Bind가 끝나기 전에도 결정된 배치가 집계에 포함되어 중복 배치가 방지된다.
2.3.2. Extension Point
Binding Cycle의 Extension Point는 다음과 같다.
PreBind: Bind 전에 필요한 준비 작업을 수행한다. Volume을 Node에 Attach하는VolumeBindingPlugin이 대표적이다.Bind: kube-apiserver에 Binding 요청을 전송하여 Pod의spec.nodeName을 설정한다. 설정된 Node 정보는 kube-apiserver를 통해서 etcd에 기록되며, 해당 Node의 kubelet이 이를 감지하여 Pod를 실행한다.PostBind: Bind 완료 후 정리 작업을 수행한다.
2.4. Scheduler 확장
kube-scheduler의 Scheduling 동작은 Extension Point에서 직접 구현한 로직이 호출되도록 만들어 확장할 수 있으며, 호출 방식에 따라서 kube-scheduler 내부에 Plugin을 추가하는 Scheduling Framework Plugin 방식과 kube-scheduler가 외부 HTTP Webhook 서버를 호출하는 Scheduler Extender 방식으로 구분된다. Scheduling Framework Plugin 방식은 모든 Extension Point를 이용할 수 있고 함수 호출로 동작하여 빠르지만 kube-scheduler를 다시 빌드해야 한다. 반면에 Scheduler Extender 방식은 kube-scheduler의 재빌드 없이 설정만으로 이용할 수 있지만, 개입할 수 있는 Extension Point가 일부로 제한되고 HTTP 왕복에 따른 지연이 발생한다.
2.4.1. Scheduling Framework Plugin
| |
Scheduling Framework Plugin으로 동작하기 위해서는 Scheduling Framework가 제공하는 Interface를 구현해야 하며, [Code 3]은 이 Interface를 축약하여 나타내고 있다. 모든 Plugin은 이름을 반환하는 Plugin Interface를 기본으로 구현하고, 동작할 Extension Point에 해당하는 다음의 Interface를 추가로 구현해야 한다.
| Extension Point | 단계 | Interface | 구현 Method |
|---|---|---|---|
PreEnqueue | Scheduling Queue | PreEnqueuePlugin | PreEnqueue() |
QueueSort | Scheduling Queue | QueueSortPlugin | Less() |
PreFilter | Scheduling Cycle | PreFilterPlugin | PreFilter(), PreFilterExtensions() |
Filter | Scheduling Cycle | FilterPlugin | Filter() |
PostFilter | Scheduling Cycle | PostFilterPlugin | PostFilter() |
PreScore | Scheduling Cycle | PreScorePlugin | PreScore() |
Score | Scheduling Cycle | ScorePlugin | Score(), ScoreExtensions() |
Reserve | Scheduling Cycle | ReservePlugin | Reserve(), Unreserve() |
Permit | Scheduling Cycle | PermitPlugin | Permit() |
PreBind | Binding Cycle | PreBindPlugin | PreBindPreFlight(), PreBind() |
Bind | Binding Cycle | BindPlugin | Bind() |
PostBind | Binding Cycle | PostBindPlugin | PostBind() |
Custom Plugin은 내장 Plugin과 동일한 방식으로 동작하기 때문에 [Table 1]의 모든 Extension Point를 구현할 수 있으며, EnqueueExtensions Interface의 EventsToRegister()를 통해서 QueueingHint도 구현할 수 있다.
| |
[Code 4]는 Maintenance Label이 설정된 Node를 제외하는 Custom Filter Plugin의 구현과 등록 예제를 나타내고 있다. Filter()는 Filtering 단계에서 Node마다 호출되며, Success 또는 Unschedulable Status를 반환하여 해당 Node의 통과 여부를 결정한다. 구현한 Plugin은 app.WithPlugin()으로 등록한 다음 kube-scheduler를 다시 빌드해야 한다. 이후에 Plugin을 활성화할 Extension Point를 KubeSchedulerConfiguration의 Profile에 있는 plugins 설정에 Plugin 이름과 함께 지정해야 이용할 수 있다. Kubernetes 공식 Plugin 모음인 scheduler-plugins Project가 이 방식을 이용한다.
2.4.2. Scheduler Extender
| |
Scheduler Extender는 [File 4]와 같이 KubeSchedulerConfiguration의 extenders에 Webhook 서버를 등록하여 이용한다. Extender는 Node를 선별하는 filter, Node의 점수를 계산하는 prioritize, Bind를 대신 수행하는 bind, Preemption의 축출 대상 선정에 개입하는 preempt 네 가지 Verb를 제공하며, kube-scheduler는 각 단계에서 명시된 URL로 HTTP 요청을 전송하여 Extender의 판단을 반영한다. [Figure 1]에서 Scheduler Extender와 연동되는 Extension Point로 표시된 Filter, PostFilter, Score, Bind가 네 가지 Verb에 대응하는 Extension Point이다.
개입 지점이 이 네 곳으로 제한되기 때문에 Reserve나 Permit 같은 나머지 Extension Point에는 개입할 수 없다. managedResources에는 Extender가 담당하는 Resource를 명시하며, 해당 Resource를 요청하는 Pod에만 Extender가 호출된다. ignoredByScheduler가 true로 설정되어 있으면 해당 Resource는 kube-scheduler의 기본 Resource 검사에서 제외되어 Extender가 할당 가능 여부를 전담한다.
Scheduler Extender는 별도로 배포되는 Custom Scheduler와 함께 이용되기도 한다. GPU 공유 Middleware인 HAMi의 hami-scheduler가 대표적인 예이며, kube-scheduler와 Scheduler Extender를 하나의 Pod로 배포하고 Mutating Webhook을 통해서 vGPU Pod의 spec.schedulerName을 hami-scheduler로 변경하는 방식으로 동작한다.
3. 참조
- Kubernetes Scheduler : https://kubernetes.io/docs/concepts/scheduling-eviction/kube-scheduler/
- Kubernetes Scheduling Framework : https://kubernetes.io/docs/concepts/scheduling-eviction/scheduling-framework/
- Kubernetes Scheduler Configuration : https://kubernetes.io/docs/reference/scheduling/config/
- Pod Scheduling Readiness : https://kubernetes.io/docs/concepts/scheduling-eviction/pod-scheduling-readiness/
- Scheduler Extender Design : https://github.com/kubernetes/design-proposals-archive/blob/main/scheduling/scheduler_extender.md
- scheduler-plugins : https://github.com/kubernetes-sigs/scheduler-plugins